

MCP Server Handler
The MCP (Model Context Protocol) Server handler allows you to run a lightweight, stateless MCP server on your gateway that automatically transforms your API routes into MCP tools.
🙋♀️ Want to try it out? Check out the MCP Quickstart.
This enables your API gateway to seamlessly serve external AI tools and agents through Model Context Protocol interactions by using your existing APIs, without needing to duplicate functionality or rebuild business logic in your backend.
Each MCP Server handler has a 1:1 relationship with a route. That means one route can host one server.
A single MCP server may have many tools, where each tool interfaces with an API route in your gateway. You can compose multiple MCP servers on different routes to tailor MCP tools for each server's specific purpose.
Setup via Portal
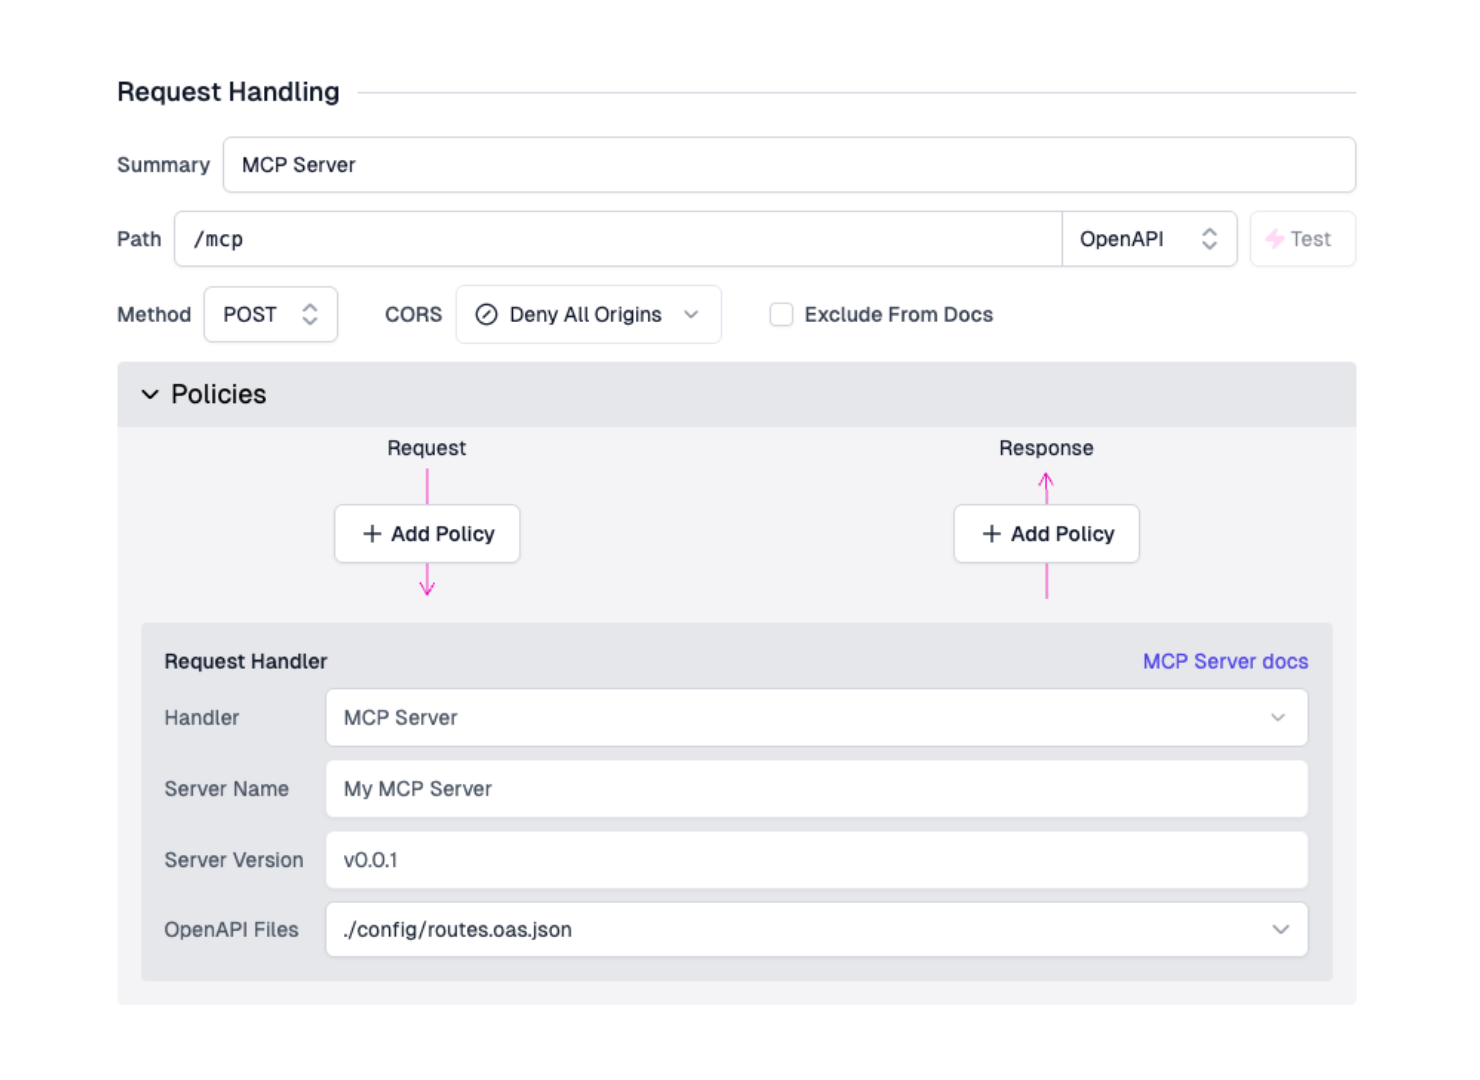
Open the Route Designer by navigating to the Files tab, then click routes.oas.json. For any route definition, select MCP Server from the Request Handlers drop-down. Set the method to POST.
Configure the handler with the following required options:
- Server Name - The name of the MCP server. AI MCP clients will read this name when they initialize with the server.
- Server Version - The version of your MCP server. AI MCP clients read this version when they initialize with the server and may make autonomous decisions based on the versioning of your MCP server and the instructions they've been given.
Next, configure your routes to be transformed into MCP tools (see Configuration section below).
Setup via routes.oas.json
The MCP Server handler can be manually added to the routes.oas.json file with the following route configuration:
Code
Configuration
The MCP Server handler requires the following configurations:
name- The name identifier of the MCP serverversion- The version of the MCP server protocol to usedebugMode: Verbose logs on server startup, initialization, tool listing, and tool calls. NOT recommended for production environments.
MCP 2025-06-18 Global Options
These options are part of the new
MCP specification (2025-06-18).
Some MCP clients may not yet support these features. If you experience
compatibility issues with your MCP client, ensure your outputSchema is a valid
type: object JSON Schema and structuredContent is also of type: object.
includeOutputSchema(optional, default:false) - Whether to include output schema from the route's OpenAPI response schema. Whentrue, the schema from successful responses (2xx) will be used asoutputSchemafor MCP tools.includeStructuredContent(optional, default:false) - Whether to include structured content in responses. Whentrue, response JSON will be parsed and included asstructuredContent. Whenfalse, onlytextcontent will be returned.
OpenAPI Routes to MCP Tools
There are two options for configuring which API routes become MCP tools:
Option 1: Transform Entire OpenAPI Files
Transform all routes from OpenAPI files into MCP tools by specifying
openApiFilePaths:
filePath: Path to an OpenAPI JSON spec file (relative to the project root)
To exclude specific routes when using this option, add
x-zuplo-route.mcp.enabled: false to those routes (see OpenAPI Configuration
section).
Option 2: Transform Individual Routes
Add specific routes as MCP tools using the openApiTools array. Specify
either path or operationId, plus the required method:
path: The route path to convert to an MCP tooloperationId: Alternative topath- uses the route's globally unique OpenAPIoperationIdmethod: The HTTP method (GET,POST, etc.)name(optional): Manually overrides the tool's namedescription(optional): Manually overrides the tool's descriptionincludeOutputSchema(optional): Override the globalincludeOutputSchemasetting for this specific routeincludeStructuredContent(optional): Override the globalincludeStructuredContentsetting for this specific route
Tool names and descriptions
Regardless of which option you use, MCP tools are configured as follows:
- Tool names: Uses the route's
operationIdif available, otherwise falls back to a generatedMETHOD_ROUTEformat (e.g.,GET_todos) - Tool descriptions: Derived from (in order of priority):
- The route's
descriptionfield - The route's
summaryfield - A generated description if neither is available
- The route's
Best Practice: Always set meaningful operationIds (like get_users,
create_new_deployment, or update_shopping_cart) and descriptions as these
help LLMs understand exactly what each tool does.
Read more about authoring usable tools and good prompt engineering practices with Anthropic's Prompt engineering overview.
OpenAPI Route Configuration
Control MCP behavior for individual routes using the x-zuplo-route extension
and the mcp options:
enabled(default:true) - Whether the route should be available as an MCP tool. Useful for excluding routes when usingopenApiFilePaths.
Authentication
OAuth Authentication
The MCP Protocol natively supports OAuth authentication to enable MCP Clients to authenticate and authorize themselves when calling tools. For more information, see the official MCP Authentication documentation.
Zuplo allows you to configure any of the built-in OAuth policies (like Auth0, Okta, etc.) on the MCP Server route to secure it. To enable OAuth authentication, you will need to have an OAuth Authorization server configured. Specifically, the OAuth Authorization server will need to support the following things:
- (Optional but recommended) OAuth 2.0 Dynamic Client Registration
- Authorization Code Grant with PKCE
- Refresh Tokens
For an example of a basic configuration of an Authorization Server with Auth0, see: Setting up Auth0 as an Authentication Server for MCP OAuth Authentication.
Once you have configured your authorization server, you can do the following to enable OAuth authentication on your MCP Server:
-
Create an OAuth policy on your MCP Server route. This policy will need to have the option
"oAuthResourceMetadataEnabled": true, for example:In this example, the audience should be the identifier of the Auth0 API you want your MCP Server to be protected by. For more information on configuring OAuth JWT policies, see the OAuth Policy docs.
-
Add the OAuth policy to the MCP Server route. For example:
-
Add the
OAuthProtectedResourcePluginto yourruntimeInitfunction in thezuplo.runtime.tsfile:Code
See the OAuth Protected Resource Plugin docs for more details.
API Key Auth
An MCP server on Zuplo can be configured to use an API key from a query parameter using the Query Parameter to Header Policy.
Currently, API keys are not supported directly by MCP. But using a API key via query params transformed through your Zuplo gateway is a great way to get up and running quickly with an MCP server.
Configure the policy to expect a query param and inject it as an Auth header:
Then, to secure your MCP endpoint, add the "query param to header" policy before your API key policy:
Will will effectively transform the query param into a Authorization: Bearer
header and pass those through to other routes on your gateway.
Then, when using MCP clients, simply add your API key as a query param! For example, in Cursor:
Testing
MCP Inspector
Use the MCP Inspector, a developer focused tool for building MCP servers, to quickly and easily test out your MCP server:
Code
By default, this will start a local MCP proxy and web app that you can use on
localhost to connect to your server, list tools, call tools, view message
history, and more.
To connect to your remote Zuplo MCP server in the Inspector UI:
- Set the Transport Type to "Streamable HTTP"
- Set the URL to your Zuplo gateway with the route used by the MCP Server
Handler (i.e.,
https://my-gateway.zuplo.dev/mcp) - If you have configured OAuth authentication, you will need to login using the OAuth flow using the Open Auth Settings button.
- Hit Connect.
Curl
For more fine grained debugging, utilize MCP JSON RPC 2.0 messages directly with curl. There are lots of different interactions and message flows supported by MCP, but some useful ones include:
Ping
To send a simple "ping" message, which can be useful for testing availability of your MCP server:
List tools
To see what tools a server has registered:
Call tool
To manually invoke a tool by name:
For more complex tools, you'll need to provide the schema compliant arguments.
Note the inputSchema for the tool from tools/list to appropriately craft the
arguments.
Read more about how calling tools works in the Model Context Protocol server specification.
OAuth Testing
If you have configured OAuth authentication for your MCP Server, you can use the MCP Inspector to test the OAuth flow.
Hit the Open Auth Settings button in the Inspector UI to start the OAuth flow. When first setting up the OAuth flow, it is recommmended to use the Guided OAuth Flow which you will see when you open the OAuth settings. This will allow you to debug the flow step by step.
The OAuth flow involves the following steps, as shown in the MCP inspector guided auth flow. After you've checked each step, click the Continue button in the MCP Inspector UI to move to the next step.
-
Metadata Discovery: The MCP Inspector will make a request to the
.well-known/oauth-protected-resourceendpoint to learn about the OAuth configuration. The MCP Inspector will then make a request to the Authorization server which you configured in theOAuthProtectedResourcePlugin, which will return the metadata it needs to continue with the OAuth flow.If you see errors in this part, check that you have correctly added the
OAuthProtectedResourcePluginto yourzuplo.runtime.tsfile, and that you have correctly configured theauthorizationServersvalue to be the canonical URL of your Authorization server, and registered an OAuth policy to the route of your MCP server. -
Client Registration: The MCP Inspector will try to use Dynamic Client Registration to register a new client with the Authorization server. Note that not all MCP Clients require this, however at this time, the MCP Inspector does. You will need to enable Dynamic Client Registration on your Authorization server if you want to test the full flow through the MCP Inspector.
If you see errors in this step, check that you have enabled Dynamic Client Registration on your Authorization server.
-
Preparing Authorization: The MCP Inspector will then redirect the user to the authorization server to login and authorize the MCP Client. Click the redirect link in the Authorization URL section to be prompted to login. After logging in, you will be given a code to copy in to the next step.
-
Request Authorization and acquire authorization code: Take the copied code from the last step and paste it in to the MCP Inspector and input it into the box.
-
Token Request: The MCP Inspector will do PKCE and make a request to the
tokenendpoint of your Authorization server to exchange the authorization code for an access token. This is attached as the Authorization header when calling your MCP server, typically as a Bearer token. -
Authentication Complete: You should now see a success message in the MCP Inspector. You can now hit the Connect button to connect to your MCP server.
If you see errors in the flow in steps 2-6, check that you have correctly configured your Authorization server to support the OAuth 2.0 Authorization Code Grant with PKCE and Refresh Tokens.
MCP Client
By connecting to an LLM enabled MCP Client, you can test the true end to end experience.
Many clients (like OpenAI, Claude Desktop, or Cursor) let you define the remote server URL and the name. For example, in Cursor, you can add your MCP server like so: